This blog post will walk you through the essential steps of using wood filler like a pro. We’ll cover topics such as selecting the right type of filler for your project, preparing the surface for application, applying the filler correctly, and providing tips for achieving a seamless and professional-looking finish. Whether you’re filling cracks, holes, or gaps in furniture, cabinetry, or any wooden structure, our expert guidance will empower you with the knowledge and techniques to achieve exceptional results.
Get ready to transform your woodworking projects and confidently tackle those unsightly imperfections as we delve into the world of wood fillers and their versatile applications. Let’s dive in!

Step 1: Choose the Right Wood Filler
Selecting the appropriate wood filler is the foundation of a successful project. Begin by considering the type of wood you’re working with and the specific imperfections you must address. Water-based wood fillers are versatile and easy to use for small indoor projects. Opt for an epoxy-based filler for outdoor projects or those requiring added durability.
Ensure you choose a filler that matches the colour of your wood or can be easily stained to match. If you’re working with wood species that are difficult to match, consider buying a custom tintable filler or mixing your filler with wood dust from the same wood species for a precise colour match.
Additionally, take note of the drying time. Some fillers dry quickly, while others may take longer. Understanding these factors will help you make the right choice for your project, ensuring a seamless blend between the filler and the wood.
Step 2: Prepare the Surface
Properly preparing the surface is vital for the filler to adhere and create a lasting bond. Begin by cleaning the wood surface thoroughly. Remove any dust, dirt, or debris using a clean, dry, or tack cloth.
Next, sand the area around the imperfection to create a rough surface for better adhesion. Use fine-grit sandpaper (typically 120-220 grit) and sand with the grain of the wood. Be sure to feather the edges of the imperfection to help blend the filler with the surrounding wood.
Wipe away the sanding dust with a tack or slightly damp cloth, and let the surface dry completely before proceeding with the filler application. Proper surface preparation ensures the filler adheres well and has a smoother finish.
Step 3: Apply the Wood Filler
Now that your surface is prepped, it’s time to apply the wood filler. Scoop a small amount of filler onto the tool using a putty knife or a flexible plastic scraper. Press the filler firmly into the imperfection, slightly overfilling it to account for shrinkage as it dries.
Smooth the filler over the imperfection, working it into any cracks or voids. If you’re dealing with larger imperfections, consider applying the filler in layers, allowing each layer to dry before adding more. This approach prevents the filler from sagging or shrinking excessively.
Work quickly, as many wood fillers have a limited working time. Smooth the surface as best as possible while the filler is still pliable, and scrape away any excess. The goal is to create a level surface that’s flush with the surrounding wood.
Step 4: Smooth and Shape
After the filler has partially dried but is still somewhat pliable, use a putty knife or a specialized filler shaping tool to smooth and shape the filled area. Feather the edges of the filler to blend it with the surrounding wood seamlessly. This step is crucial for achieving a natural, flawless finish.
For added precision, you can moisten the putty knife or shaping tool with water to help create a smoother surface and prevent sticking. Continue shaping and smoothing until the filler closely matches the contours of the wood.
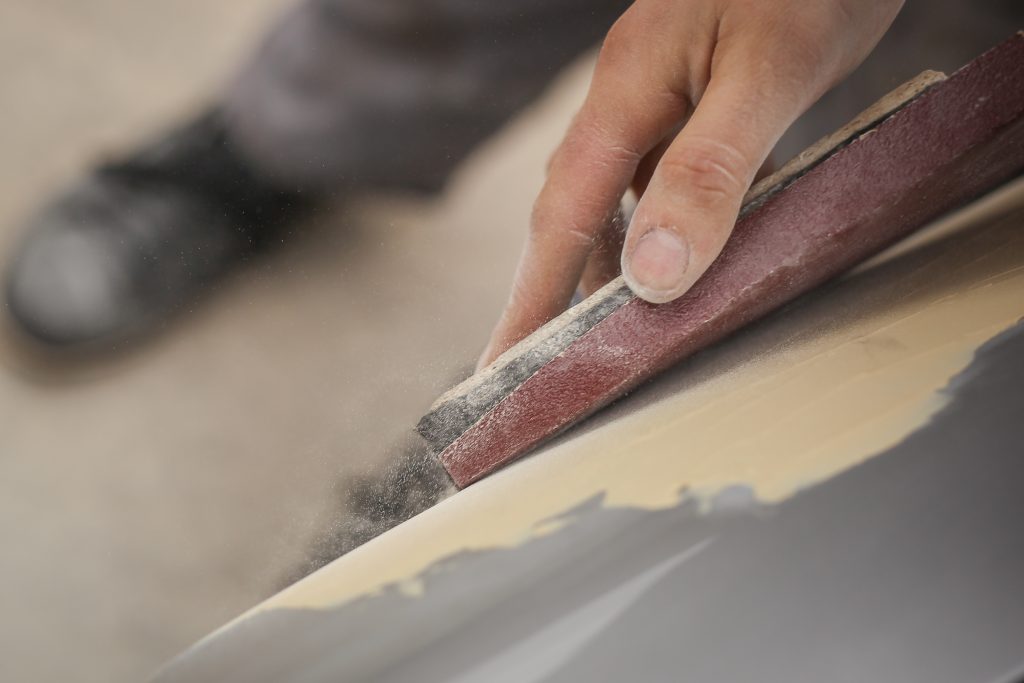
Step 5: Sand and Finish
Once the filler has dried completely, typically after a few hours or according to the manufacturer’s instructions, it’s time to sand the filled area. Start with coarse-grit sandpaper (around 120 grit) to level the filler with the wood surface. Always sand with the grain of the wood to avoid creating scratches or visible imperfections.
Gradually progress to finer-grit sandpapers, such as 220 grit and beyond, to achieve a smooth and polished finish. Be meticulous during this step, as achieving a seamless transition between the filler and the wood is essential for a professional look.
After sanding, wipe the surface clean to remove any sanding dust. Your wood is ready for staining or painting to match the surrounding wood or your desired finish.
Step 6: Paint or Stain
Before applying paint or stain:
- Ensure the surface is clean and dust or debris-free.
- If you’re staining the wood, choose a colour matching the project’s rest or your desired colour.
- Apply the stain evenly with a brush or cloth, following the manufacturer’s instructions.
If you’re painting the wood, use a paint that adheres well to wood and is suitable for your project. Apply at least two coats of paint, allowing each coat to dry thoroughly before applying the next—sand lightly between coats for a smoother finish.
Once the paint or stain is dry, your project will have a cohesive and polished appearance, with the filled area seamlessly blending in with the rest of the wood.
Step 7: Maintenance and Care
To ensure the longevity of your wood-filled surfaces, it’s essential to perform regular maintenance. Follow the appropriate care and maintenance guidelines depending on the finish you applied (paint or stain). This may include periodic cleaning, re-staining, or re-painting as needed.
Inspect your wood-filled areas for any signs of cracking or shrinking over time. If you notice any issues, follow the steps above to repair and re-finish as necessary. Regular maintenance and care will keep your wood projects looking their best for years.
By following these detailed steps, you’ll be well-equipped to use wood filler effectively in your woodworking and DIY projects, achieving professional results that enhance the beauty and functionality of your creations.
Conclusion
In conclusion, mastering the art of using wood filler is a skill that can transform your woodworking and DIY projects, leaving them looking flawless and professional. Here’s a brief recap of the critical steps:
- Choose Wisely: Select the right wood filler type, colour, and drying time for your project to ensure a seamless blend with your wood.
- Prepare Thoroughly: Properly clean and sand the surface to create an ideal foundation for the filler to adhere to.
- Apply with Care: Apply the filler, overfilling slightly, and work it into imperfections. Smooth and shaped while it’s still pliable.
- Achieve Perfection: Sand the dried filler meticulously to create a level surface that seamlessly integrates with the wood.
- Finish Strong: Stain or paint to match the surrounding wood, and follow up with maintenance and care for long-lasting beauty.
With these steps, you can confidently tackle any project, from repairing furniture to restoring wooden structures, and achieve professional-looking results. Wood filler is your secret weapon for turning imperfections into highlights, ensuring that your woodworking projects stand the test of time and impress everyone who beholds them. Happy woodworking!
Leave a Reply