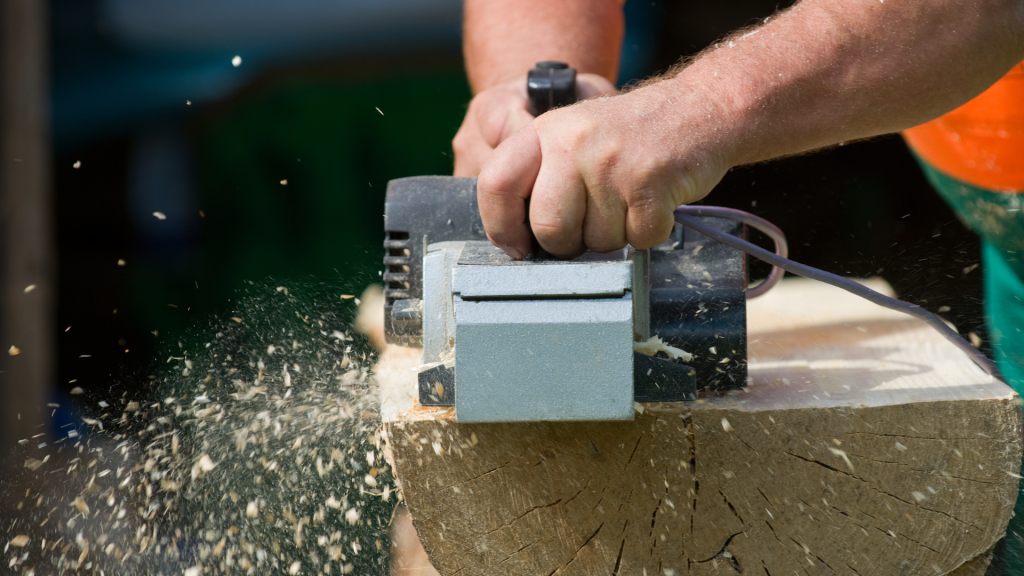
Whether you’re a beginner or an experienced woodworker, using a wood planer efficiently is essential for achieving smooth and precise woodworking results. A wood planer is a powerful tool that enables you to shape and flatten rough wood surfaces with ease, creating stunning woodworking projects. However, proper technique and safety precautions are crucial to ensure a safe and accurate woodworking experience.
In this comprehensive guide, we will discuss everything you need to know about using a wood planer efficiently. From understanding the basics of a wood planer to selecting the right one and mastering planing techniques, we will cover it all. You will also learn about important safety measures and maintenance tips for your wood planer.
Key Takeaways
- Using a wood planer efficiently is crucial for achieving smooth and precise woodworking results.
- Understanding the basics of a wood planer, selecting the right one, and following safety precautions are essential for a safe and accurate woodworking experience.
- Mastering planing techniques for different wood types, including flat surfaces, edges, chamfers, and doors, is crucial for achieving desired results.
- Proper maintenance and care are essential for the longevity and performance of your wood planer.
- Keep exploring and practicing to enhance your woodworking skills further.
Understanding the Basics of a Wood Planer
Whether you are a professional or a novice woodworker, understanding the basics of a wood planer is crucial for achieving precise and smooth results. A wood planer is a power tool used to trim and level wooden surfaces, bringing them to a consistent thickness and removing any rough spots or irregularities.
The basic components of a wood planer include:
| Component | Function |
|---|---|
| Cutterhead | This rotating drum contains the cutting knives that trim the wood surface. |
| Feed rollers | These rollers move the wood through the planer and keep it in place during cutting. |
| Bed | The flat surface where the wood is placed and moved through the planer. |
| Blade adjustment mechanism | This mechanism is used to adjust the height of the cutterhead to control the depth of cut. |
| Dust collection port | A port for connecting a vacuum to collect wood shavings and dust. |
There are two main types of wood planers: handheld and stationary. Handheld planers are portable and can be used for small projects or to trim uneven boards. Stationary planers are larger and more powerful and are designed for bigger projects, allowing woodworkers to cut and plane wood more quickly and accurately.
Benefits of using a wood planer
Using a wood planer has several benefits, including:
- Creating consistent and uniform thickness
- Removing cracks, bumps, and other rough spots
- Reducing sanding time and effort
- Improving the overall quality and appearance of woodworking projects
Understanding the basics of a wood planer is the foundation for mastering the art of woodworking. By taking the time to learn and practice proper techniques, you can produce high-quality, professional-grade projects.
Choosing the Right Wood Planer
Choosing the right wood planer for your woodworking projects is crucial for achieving the desired results. There are several factors to consider when selecting a wood planer, including the type of woodworking you’ll be doing and your budget. Here are some things to keep in mind:
Type of Wood Planer
There are several types of wood planers available in the market, each with its unique features and advantages. Consider the following:
- Benchtop planers: These are small, portable planers that are ideal for small to medium-sized woodworking projects. They are perfect for hobbyist woodworkers who want to achieve accurate and precise results without spending a lot of money.
- Handheld planers: These are compact and lightweight planers that are perfect for jobs that require a bit of finesse and manual control. They are great for small projects and quick touch-ups and are often used by carpenters and DIY enthusiasts.
- Stationary planers: These are large, heavy-duty planers that are ideal for professional woodworkers who need to handle large volumes of wood. They are powerful and efficient and can handle even the toughest of jobs.
Cutting Capacity
The cutting capacity of a wood planer refers to the maximum amount of wood that can be removed in a single pass. Consider the following:
- Thickness planers: These planers can handle thicker pieces of wood and can remove a lot of material in a single pass. They are perfect for creating large and thick pieces of lumber for furniture and other woodworking projects.
- Jointer planers: These planers are perfect for creating smooth and flat surfaces, which are ideal for gluing pieces of wood together. They can remove small amounts of material in a single pass and are perfect for flattening and squaring edges.
Blade Quality
The quality of the blade is a critical factor in determining the overall performance of the wood planer. Consider the following:
- High-speed steel blades: These are standard blades that come with most benchtop and handheld planers. They are affordable and can handle most woodworking projects.
- Carbide blades: These are high-quality blades that are designed to last longer and cut more efficiently than high-speed steel blades. They are more expensive but are ideal for professional woodworkers who need to handle large volumes of wood.
Price
When considering the purchase of a wood planer, it’s important to understand that the price can vary significantly based on the type and features of the planer. As per the Buildiro price comparison website, the cost of wood planers in the UK ranges from as low as £35 for the most basic models to as high as £482 for the top-of-the-line options. This wide price range suggests that there’s a wood planer for every budget. However, before making your decision, consider the amount of woodworking you plan to do. Keep in mind that investing in a high-quality wood planer, although potentially more expensive upfront, can be more cost-effective in the long run. Higher-quality planers typically yield better woodworking results and require less maintenance, thereby saving you money and time over time. Therefore, balancing your budget with the quality and features you need is key to making a wise investment in your woodworking tools.
Safety Precautions to Follow with a Wood Planer
Working with a wood planer can be a dangerous task if not executed with proper care and precaution. Here are some important safety measures to take when using a wood planer:
- Wear appropriate safety gear: Protective gear such as safety glasses, gloves, ear protection, and dust masks are necessary to avoid any injury or discomfort.
- Ensure the area is clear: Make sure that the working area is clear of any debris, and bystanders are at a safe distance.
- Disconnect the power: Before making any blade adjustments or maintenance, ensure that the power cord is disconnected from the socket to prevent accidental startup.
- Secure the wood: Use clamps or other appropriate means to secure the wood in place before operating the wood planer.
- Never place your fingers near the blades: Keep your fingers a safe distance away from the blades at all times, and never reach into the machine while it is in operation.
- Avoid loose clothing: Clothing or jewelry that dangles or hangs loosely can get caught in the machine, causing severe injuries.
- Keep the machine clean: Regular cleaning and proper maintenance of the wood planer can prevent accidents and ensure optimal performance.
Remember, safety should always come first when using a wood planer. By taking the necessary precautions, you can enjoy a safe and productive experience with your woodworking projects.
Setting Up the Wood Planer
Properly setting up your wood planer is essential for achieving accurate and precise results. Here’s a step-by-step guide on how to set up your wood planer:
- Clean the work area: Before starting, ensure that your work area is clean and free of any debris or sawdust that could interfere with the planer’s performance.
- Adjust the blade height: The blade height should be set according to the thickness of the wood you are planing. Use the depth adjustment knob to raise or lower the blade, keeping in mind that the blade should not be set too high or too low.
- Adjust the infeed and outfeed rollers: The infeed and outfeed rollers should be adjusted so that they are parallel to the bed of the planer. This will ensure that the wood passes through the planer smoothly and consistently.
- Set the depth of cut: The depth of cut determines how much wood is removed with each pass. Adjust the depth of cut according to the thickness of the wood and the desired outcome.
- Check the fence: If your wood planer has a fence, ensure that it is set at the correct angle. A straight fence should be set at 90 degrees to the bed of the planer for planing edges or creating flat surfaces. An angled fence can be used to create bevels or chamfers.
- Switch on the planer: Switch on the wood planer and wait for the cutterhead to reach full speed before feeding the wood through.
- Feed the wood through: Use the infeed roller to feed the wood through the planer, keeping your hands clear of the cutterhead. Use a push stick to guide the wood through the planer, ensuring that it remains flat and level as it passes through.
- Inspect the wood: Once the wood has passed through the planer, inspect it for any imperfections or areas that may require further planing.
- Repeat as needed: Depending on the thickness of the wood and the desired outcome, you may need to repeat the planing process several times, adjusting the depth of cut as necessary.
By following these steps, you can ensure that your wood planer is set up correctly and ready to use efficiently. Remember to always follow safety precautions when using a wood planer, and consult the manufacturer’s manual for any specific instructions.
Planing Techniques for Different Wood Types
When it comes to woodworking, different types of wood require different planing techniques to achieve the desired results. Understanding the characteristics of the wood you’re working with is crucial for determining the best planing approach. The following are some tips on how to plane different wood types effectively:
Softwoods
Softwoods such as pine and spruce can be prone to tear out, so it’s important to pay close attention to the grain direction. Planing against the grain can result in rough and uneven surfaces. To minimize tear-out, it’s best to plane with the grain direction, using a sharp blade and taking light cuts.
Hardwoods
Hardwoods such as oak and maple can be challenging to plane due to their density and hardness. It’s vital to use a sharp blade and take light cuts to prevent the wood from splintering or chipping. When planing, pay attention to the grain direction, and if the wood is particularly figured or has irregular grain patterns, try using a back-bevel technique to reduce tear-out.
Exotic Woods
Exotic woods such as teak and mahogany can present their own unique challenges when it comes to planing. These woods can be oily and dense, making it essential to use a sharp blade and take light cuts. To avoid tear-out, planing with the grain is crucial.
Figured Woods
Figured woods such as birdseye maple and curly cherry feature unique grain patterns that require special consideration when it comes to planing. To achieve the best results, it’s essential to plane with the grain direction, using a sharp blade and taking light cuts. Using a back-bevel technique can also help to prevent tear-out.
“Different types of wood require different planing techniques to achieve the desired results.”
By following the appropriate planing techniques for the wood you’re working with, you can ensure a smooth and even finish on your woodworking projects. Remember to use a sharp blade, take light cuts, and pay attention to the grain direction to minimize tear-out and achieve the best possible outcome.
Planing Flat Surfaces
Planing flat surfaces is an essential woodworking skill that requires practice and patience. With the right technique and tools, you can achieve smooth and even results that will enhance the final project’s appearance. Follow these steps to master planing flat surfaces with a wood planer:
Step 1: Assess the Surface
Before starting to plane, examine the surface to determine the direction of the grain. Planing in the direction of the grain will produce the best results, avoiding any tear-out or rough patches. Ensure that the surface is clean and free from any debris or obstacles that may interfere with the planing process.
Step 2: Set the Blade Height
Adjust the blade height according to the thickness of the wood you’re planing. A good rule of thumb is to set the blade height to remove no more than 1/16 inch of wood at a time. You can adjust the blade height by turning the adjustment knob or lever found on the top or side of the planer. Refer to your planer’s user manual for specific instructions.
Step 3: Set the Depth of Cut
Setting the depth of cut determines how much wood the planer will remove with each pass. Begin with a shallow depth of cut and gradually increase it until you achieve the desired results. For instance, if you need to remove 1/8 inch, start with a depth of cut of 1/16 inch and make two passes to achieve the target depth.
Step 4: Start Planing
Start by placing the wood on the planer’s infeed table with the rough face facing up. Turn on the planer and push the wood through at a steady pace. Maintaining a steady pace will help produce even results. Once you’ve passed the wood over the planer, use a straight edge or winding sticks to check if the surface is flat. If not, keep planing until you achieve your desired flatness.
Step 5: Finishing Touches
Once you’ve planed the surface to the desired flatness, you can start applying finishing techniques. Sanding the surface with fine-grit sandpaper or a sanding block will smooth out any rough patches. Use a vacuum or brush to remove any wood shavings or debris from the surface.
By following these steps, you can master the art of planing flat surfaces with a wood planer. Don’t rush the process, take your time, and enjoy the satisfaction of turning rough lumber into polished woodworking projects.
Planing Edges and Chamfers
Planing edges and chamfers is a common technique in woodworking for shaping the edges of a workpiece or creating a decorative beveled edge. In this section, we will explore the process of planing edges and chamfers with a wood planer.
Preparing the Wood Piece
Before planing an edge or chamfer, it’s crucial to prepare the wood piece to ensure accuracy and consistency. First, ensure that the face and edge of the wood piece are perpendicular and straight. This can be achieved by using a jointer or a hand plane.
Next, mark the area where you want to create the edge or chamfer. For a beveled edge, mark the width and angle of the bevel. Make sure to mark both sides of the workpiece to ensure symmetry.
Setting Up the Wood Planer
Once the wood piece is prepared, it’s time to set up the wood planer. Adjust the blade height and depth of cut according to the desired edge or chamfer width and angle. It’s recommended to make multiple light passes rather than one heavy pass to achieve a smooth and consistent result.
When planing an edge, use a push block to keep your hands clear of the blade and the workpiece stable. For chamfers, use a chamfer jig to ensure accurate and consistent angles.
Finishing the Edge or Chamfer
After planing the edge or chamfer, use sandpaper to smooth out any rough edges or imperfections. Sand in the direction of the grain, starting with a coarse grit and gradually working your way up to a finer grit for a polished finish.
For a decorative touch, consider adding a decorative edge with a router or a chisel.
Planing Doors with a Wood Planer
Planing a door is a common woodworking task that requires precision and care. Whether you’re trying to achieve a better fit or remove imperfections, using a wood planer can help you achieve professional results. In this section, we’ll guide you through the necessary steps to plane a door with a wood planer, ensuring a perfect fit that will last for years to come.
Step 1: Determine Which Areas Need Planing
Start by carefully examining the door and identifying the areas that require planing. Use a pencil to mark these areas for reference. Common places that require planing include the edges of the door or the bottom, where the door may be rubbing against the door frame or the floor.
Step 2: Remove the Door from Its Hinges
Before you begin planing, it’s essential to remove the door from its hinges and lay it flat on a work surface. You may want to use a pair of sawhorses or a workbench, ensuring that the door is stable and secure before proceeding.
Step 3: Use a Wood Planer on the Marked Areas
Using a wood planer, start to remove small amounts of wood from the marked areas. Make sure to use consistent strokes and apply even pressure to avoid removing too much material. Test the fit frequently as you work, ensuring that the planed areas are even and smooth.
Step 4: Reinstall the Door
Once you’ve achieved the desired fit, reinstall the door back onto its hinges. Test the door to ensure that it opens and closes smoothly without rubbing against the frame or the floor.
Note: It’s essential to take your time when planing a door, as removing too much material can permanently damage the door. Remember to wear protective gear such as safety glasses and gloves to avoid injury.
By following these steps, you’ll be able to achieve a perfect fit for your door, ensuring smooth operation and a professional finish.
Maintaining and Caring for a Wood Planer
A wood planer is an investment that requires proper maintenance and care to ensure optimal performance and longevity. Here are some tips and guidelines to help you maintain and care for your wood planer:
Clean the Planer After Each Use
Always clean your wood planer after each use to prevent dust and debris from accumulating. Use a soft-bristled brush to remove any debris from the blades, tables, and other parts of the planer. You can also use a vacuum to remove any dust or debris that is difficult to reach.
Sharpen the Blades Regularly
Sharp blades are essential for achieving precise results with your wood planer. Check the blades regularly and sharpen them as needed. If the blades are too dull, they can damage the wood or even cause dangerous kickback. Follow the manufacturer’s instructions for sharpening the blades or take them to a professional to be sharpened.
Check the Belt Tension
The belt tension on your wood planer should be checked regularly. If it is too loose, the planer will not work properly, and if it is too tight, it can cause unnecessary strain on the motor. Follow the manufacturer’s instructions for checking and adjusting the belt tension.
Oil the Planer
Regularly oiling your wood planer can help lubricate the moving parts and prevent rust and corrosion. Use a light machine oil or the oil recommended by the manufacturer. Apply a few drops to the moving parts of the planer and wipe any excess oil with a clean cloth.
Store the Planer Properly
When not in use, store your wood planer in a dry and clean area. Avoid storing it in humid or damp areas, as this can cause rust and corrosion. Cover the planer with a dust cover to keep it clean and protected.
Replace Worn or Damaged Parts
If you notice any worn or damaged parts on your wood planer, it’s important to replace them immediately. Don’t attempt to use the planer if any parts are damaged or broken, as this can cause serious injury.
Remember, properly maintaining and caring for your wood planer is essential for achieving accurate and precise results with your woodworking projects. By following these simple tips and guidelines, you can ensure your wood planer is performing at its best and achieve stunning woodworking results every time.
Conclusion
In conclusion, successfully using a wood planer is an essential skill to have for any woodworking enthusiast. By understanding the basics of the tool, selecting the appropriate planer, following safety precautions, and applying proper techniques, you can achieve impressive woodworking projects. Remember to take your time and practice to hone your skills and refine your craft.
Thank you for reading this comprehensive guide on how to use a wood planer efficiently. We hope this article has been informative and useful in enhancing your woodworking skills. Happy woodworking!
FAQ
How do I effectively use a wood planer?
To use a wood planer efficiently, begin by understanding the basics of the tool and its components. Make sure you choose the right wood planer for your project. Follow safety precautions, set up the planer correctly, and learn the appropriate planing techniques for different wood types. Practice planing flat surfaces, edges, and chamfers. Additionally, learn how to use a wood planer on doors. Lastly, maintain and care for your wood planer to ensure its optimal functionality.
What are the basic components and functions of a wood planer?
A wood planer consists of various parts, including the cutterhead, feed rollers, infeed table, outfeed table, and depth adjustment mechanism. The cutterhead houses the blades responsible for removing wood material. The feed rollers help move the wood through the planer. The infeed and outfeed tables support the wood during the planing process. The depth adjustment mechanism allows you to control the depth of cut.
How do I choose the right wood planer?
When selecting a wood planer, consider factors such as the size of your woodworking projects, the type of wood you’ll be working with, and your budget. There are various types of planers available, including handheld planers, benchtop planers, and thickness planers. Research the features and specifications of each type to determine which one suits your needs best.
What safety precautions should I follow when using a wood planer?
Safety is paramount when working with a wood planer. Prior to use, ensure you are wearing appropriate protective gear, such as safety glasses and ear protection. Avoid loose clothing or jewelry that may get caught in the machine. Keep your hands away from the cutterhead and blades, and always use push blocks or push sticks to feed the wood. Unplug the planer when not in use and keep it out of reach of children.
How do I set up a wood planer?
To set up a wood planer, start by adjusting the blade height to achieve the desired depth of cut. Next, adjust the infeed and outfeed tables to ensure they are parallel to the cutterhead. Check the alignment of the fence if your planer has one. Finally, verify that the feed rollers are clean and properly adjusted for smooth feeding of the wood.
What planing techniques should I use for different wood types?
Different wood types may require specific planing techniques. When planing hardwood, consider the direction of the wood grain and adjust your feed direction accordingly. For softwoods, be cautious of tear-out and adjust your planing technique to minimize it. Experiment with different techniques and practice on scrap pieces to find what works best for each wood type.
How do I achieve flat surfaces when planing?
Planing flat surfaces requires proper technique and attention to detail. Begin by ensuring the wood is securely supported and level on the infeed and outfeed tables. Use consistent and even pressure when feeding the wood through the planer to avoid uneven removal of material. Make multiple passes, gradually reducing the depth of cut until the surface is flat and smooth.
How do I plane edges and create chamfers?
Planing edges and creating chamfers can be achieved by angling the wood against the fence or using a chamfer guide. Securely hold the wood and pass it through the planer, maintaining consistent pressure and feed speed. For chamfers, adjust the depth and angle of cut to achieve the desired beveled edge.
How do I use a wood planer on a door?
When planing a door, start by removing the door from its hinges and placing it on a stable surface. Use a straightedge or level to identify areas that need planing. Securely hold the door and feed it through the planer, making multiple passes if necessary, until the desired fit or surface smoothness is achieved.
How do I maintain and care for a wood planer?
Proper maintenance and care will prolong the lifespan of your wood planer. Regularly clean the blades, feed rollers, and tables to remove debris and prevent buildup. Lubricate the moving parts as recommended by the manufacturer. Check the blades for sharpness and replace them when necessary. Store the planer in a dry and secure place when not in use.
Leave a Reply