Ever stared at a radiator cover, wondering where to start pulling it apart? You’re not alone! Many of us in the UK find ourselves in this pickle, especially when it’s time for a good clean, a room refresh, or maybe a heating overhaul. That’s exactly why we rolled up our sleeves and decided to dig deep, reaching out to the real experts in the field – the seasoned plumbers who’ve been there, done that. We wanted to create a guide that’s not just informative, but also feels like you’ve got a friend guiding you through each step.
In this blog post, we’re unfolding the mysteries of how to remove different types of radiator covers, all while keeping it real and grounded. We’ve captured the wisdom and handy tricks from plumbers across the UK to ensure you get the practical advice and confidence boost needed to tackle the job. From the commonplace designs gracing our homes to the quirky covers that leave us puzzled, we’ve got your back.
So, whether you’re a DIY lover, a homeowner on a mission to beautify your space, or a professional aiming to perfect your craft, this guide is crafted with love, care, and a sprinkle of plumber’s wit. Stay tuned as we embark on this journey together, unraveling the tools of the trade, sharing step-by-step wisdom, and throwing in some pro tips to make your radiator cover removal experience a breeze. Welcome to the club – let’s get those covers off!
How to Remove Radiator Covers: 7 Easy Steps
Preparation:
- Gather Your Tools: Ensure you have all necessary tools on hand, such as a screwdriver, pliers, and a cloth to protect the floor.
- Safety First: Turn off the heating system and ensure the radiator is completely cool to avoid any potential burns or injuries.
- Protect Your Space: Lay down a protective cloth or sheet around the work area to catch any dust or debris.
Identifying the Type of Radiator Cover:
- Standard Covers: Typically attached with screws or brackets.
- Cabinet Style: May have additional fastenings or be set into the wall.
- Built-In Units: Could be more complex, possibly requiring additional steps to remove.
Removing Standard Radiator Covers:
- Locate Fastenings: Identify where the cover is attached to the wall or radiator.
- Unscrew and Unfasten: Use the appropriate tools to carefully remove screws or brackets.
- Lift Off the Cover: Once all fastenings are removed, gently lift the cover away from the radiator.
Removing Cabinet Style Covers:
- Check for Additional Fastenings: Ensure all screws and brackets are located, including any that may be hidden within the cabinet.
- Remove Shelves or Panels: If applicable, take out any internal parts to access the fastenings.
- Unscrew and Detach: Use your tools to remove all fastenings and gently pull the cover away from the wall or radiator.
Handling Built-In Units:
- Assess the Situation: Built-in units may be more complex, so take time to thoroughly assess how the cover is attached.
- Consult a Professional if Needed: If unsure, it may be safer to consult a professional before proceeding.
- Proceed with Caution: If confident, follow the necessary steps to remove screws, brackets, or any additional fastenings before lifting away the cover.
Post-Removal:
- Check for Damage: Examine the wall, radiator, and cover for any signs of damage that may need addressing.
- Clean the Area: Use this opportunity to clean behind and around the radiator before replacing the cover.
- Replace or Upgrade: If desired, now is the perfect time to replace or upgrade your radiator cover.
Final Check:
- Ensure Everything is Secure: Before walking away, make sure everything is put back in place securely, and there are no loose parts or potential hazards.
- Turn the Heating Back On: Once everything is secure and in place, you can turn your heating system back on.
By following these bullet points, you should have a clear and concise guide to removing radiator covers, whether they are standard, cabinet style, or built-in units. Remember, when in doubt, it’s always best to consult with a professional to ensure safety and accuracy.
How to Remove Radiator Covers with Clips
Radiator covers with clips are quite common and generally easier to remove than other types. Here’s a straightforward guide to help you through the process:
Preparation:
- Ensure Safety: Make sure the radiator is turned off and completely cool to the touch to prevent any accidental burns.
- Protect Your Floor: Place a cloth or towel on the floor underneath the radiator cover to catch any dust or debris that may fall during the removal process.
Locating the Clips:
- Inspect the Cover: Take a close look at your radiator cover to locate the clips. These are usually found at the top and bottom of the cover.
- Understand the Clip Mechanism: Different radiator covers have different types of clips. Some need to be pushed, pulled, or slid to release the cover. Ensure you understand how the clips on your cover work before proceeding.
Removing the Radiator Cover:
- Gently Release the Clips: Using your hands, gently apply pressure to release the clips. You might need to push down, pull up, or slide the clips depending on the mechanism.
- Support the Cover: As you release the clips, make sure to support the cover with your other hand to prevent it from falling.
Post-Removal:
- Inspect for Damage: Check the clips and the areas where they attach to ensure nothing is broken or damaged.
- Clean Behind the Radiator: Use this opportunity to clean any dust and debris from behind the radiator.
- Reattach or Replace: If you are reattaching the same cover, ensure the clips are in good condition and secure it back in place. If you’re replacing it, make sure the new cover fits properly and is securely attached.
Final Check:
- Ensure Everything is Secure: Before considering the job done, double-check that the radiator cover is securely in place and the clips are properly engaged.
- Turn the Heating Back On: Once everything is securely in place, you can turn the radiator back on.
How to Remove Stelrad Radiator Covers in 3 Easy Steps
telrad radiators are popular in many homes for their efficiency and sleek design. Removing their covers for cleaning or maintenance purposes might seem challenging at first, but with the right guidance, it can be a straightforward process. Below is a detailed step-by-step guide to help you safely remove Stelrad radiator covers.
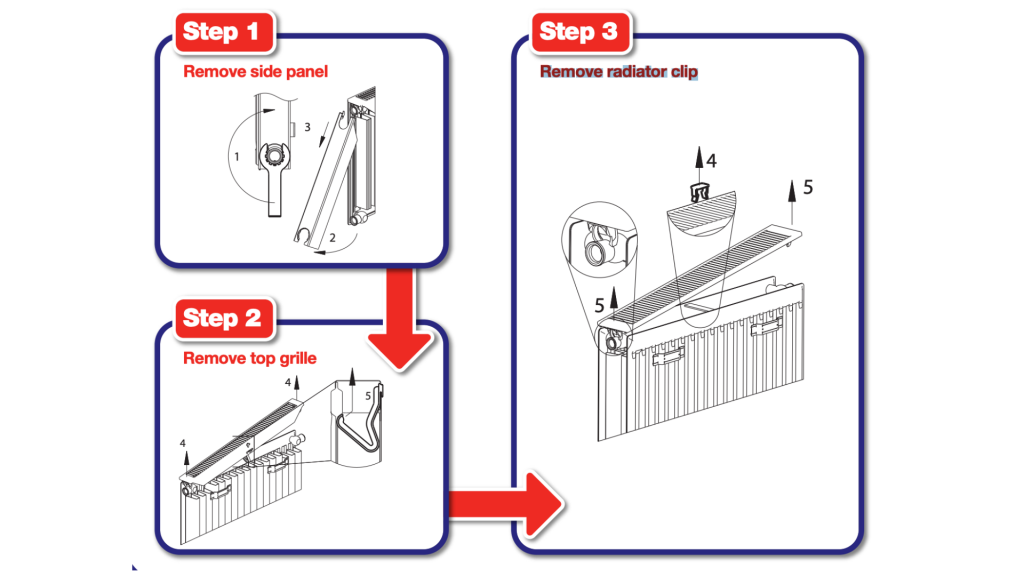
Step 1: Remove Side Panel
- Locate the Panel Latches: Start by locating the latches or clips that hold the side panel in place. These are usually situated at the top and bottom of the panel.
- Gently Release the Latches: Carefully press or push the latches to release the side panel. Ensure you’re providing support with your other hand to prevent the panel from falling.
- Remove the Side Panel: Once the latches are released, gently slide the side panel away from the radiator. Make sure to do this carefully to avoid damaging any components.
Step 2: Remove Top Grille
- Locate the Grille Fixings: Identify the fixings that hold the top grille in place. These could be clips, screws, or latches depending on the model.
- Release the Fixings: Using the appropriate tool (like a screwdriver if screws are present), carefully release the fixings.
- Lift Off the Top Grille: With the fixings released, gently lift the top grille away from the radiator. Be mindful of any wires or components that might be connected.
Step 3: Remove Radiator Clip
- Locate the Radiator Clips: Look for the clips that secure the radiator to the bracket. These are usually found on the back side of the radiator.
- Release the Radiator Clips: Use a flathead screwdriver or a similar tool to gently press down on the clips and release the radiator from the bracket.
- Gently Lower the Radiator: With the clips released, carefully lower the radiator away from the bracket. Ensure you’re supporting the radiator adequately to prevent any damage.
Post-Removal Checks and Cleaning
- Inspect for Damage: After removal, inspect the radiator, brackets, and cover components for any signs of damage or wear.
- Clean the Radiator and Components: Use this opportunity to clean the radiator, side panel, top grille, and any other components that may have accumulated dust or debris.
Reassembly (If Necessary)
- Reattach the Radiator: If you removed the radiator from the bracket, carefully lift it back into place and secure the clips.
- Reattach the Top Grille: Align the top grille back into its original position and secure it with the fixings.
- Reattach the Side Panel: Finally, slide the side panel back into place, ensuring that the latches or clips are securely fastened.
Conclusion
Navigating the world of radiator covers, particularly when it comes to removal, might initially appear daunting. However, armed with the right knowledge and tools, this task transforms into a manageable, and even empowering DIY project. Throughout this guide, we’ve delved into the specifics of how to safely and efficiently remove radiator covers, ensuring you’re well-equipped to tackle this task head-on.
We kicked off our journey by emphasizing the importance of preparation, highlighting the need for the right tools and a safe work environment. Ensuring that the radiator is completely cool and protecting the surrounding area with a cloth sets a solid foundation for the task at hand.
Next, we explored the process of identifying different types of radiator covers. From standard and cabinet style to built-in units, understanding the structure of your radiator cover is crucial for a seamless removal process. For each type, we provided detailed, step-by-step instructions, demystifying the process and ensuring that even those new to DIY can confidently approach this task.
For those dealing with radiator covers attached with clips, we offered a specific guide to tackle this common setup, ensuring that regardless of the type of cover you have, you’re covered. We shared expert advice on how to gently release clips and safely remove the cover, all while maintaining the integrity of your radiator and its components.
As we wrap up this guide, it’s important to reiterate the value of patience and attention to detail when removing radiator covers. Taking the time to properly assess and understand your radiator cover, using the right tools, and proceeding with caution ensures not just a successful removal, but also paves the way for easier maintenance, cleaning, and potential upgrades in the future.
In essence, this guide serves as your go-to resource, empowering you to take control and confidently remove your radiator covers, whatever type they may be. Happy DIY-ing, and here’s to mastering the art of radiator cover removal!
Why You Can Trust Buildiro.com?
Buildiro.com has rapidly established itself as a trustworthy and reliable platform, catering to the diverse needs of homeowners, contractors, and DIY enthusiasts alike. With a commitment to quality and transparency, the website meticulously curates its product listings, ensuring that every item meets stringent standards of durability and performance. User experience is at the forefront of Buildiro.com’s mission, evidenced by its intuitive interface and streamlined search functionality that makes finding the right product a breeze. Additionally, the platform fosters a sense of community and expertise through comprehensive guides, expert reviews, and helpful DIY tips, empowering users to make informed decisions. The dedication to customer satisfaction doesn’t end there; Buildiro.com’s responsive customer service team is always ready to assist, addressing queries and resolving any issues promptly. Furthermore, the platform’s commitment to offering competitive prices ensures that users not only receive products of the highest caliber but also enjoy value for their money. All these facets converge to make Buildiro.com a trustworthy ally for all your building and home improvement endeavors, cementing its reputation as a platform that genuinely cares about quality, value, and the satisfaction of its users.
Leave a Reply