Installing a chandelier in your home is a great way to add a touch of class and make a statement. They’re eye-catching and are sure to be a conversation starter. If you are considering installing a chandelier in your home, you can do so yourself pretty easily. This article will take you through how to hang a chandelier step-by-step.
Step 1: Gather your tools
Making sure you have the correct tools can make the process much easier and safer for you. So, before you install a chandelier, prepare the following:
- Voltage tester
- The correct screwdriver
- Wire connectors (wire nuts)
- Wire strippers
- A ladder
- A helper (chandeliers can be very heavy)
Step 2: Get ready
Unpack your new chandelier, lay out your equipment, and make sure you have all of the parts required.
The following step is critical: make certain that the electricity is turned off! At the very least, turn off the light switch, but ideally, turn off the power to the light circuit in the circuit breaker.
Step 3: Remove your existing light fixture

This step will differ based on the type of light fixture you have. You may need to unscrew a ceiling shade or anything similar to remove it entirely. After removing the ceiling fixture shade, detach the mounting screws that hold the fixture to the ceiling box and separate the fixture base from the ceiling. If you’re removing a chandelier, it might be heavy, so get some help to support its full weight.
Step 4: Disconnect the wiring
Once the fixture base has been removed from the ceiling box, use a voltage tester to ensure that no current is flowing to the wires. If you’re at all unsure or confused about what to do, stop and hire an electrician. Always remember that safety comes first!
When you’re absolutely certain that there’s no electricity, go ahead and unscrew the wire connections to disconnect the light fixture from the circuit wires. A copper grounding wire may also be linked to the fixture’s mounting strap on the box or to the circuit grounding wire. This has to be disconnected. You can now set aside your old light fixture.
Step 5: Measure
Getting the height of the chandelier is critical. You don’t want to finish installing it only to realise it’s too long, so figure out the perfect length to hang it from the ceiling. If it’s hanging above a table, ensure that it’s at least 30 inches over it.
Aside from ensuring that it looks excellent in your space, a chandelier’s main job is to illuminate it. The way light is projected is determined by the fixture design, light bulbs, and chandelier height. The most important thing is that you’re happy with how it looks.
Step 6: Prepare your new ceiling fixture
Because each chandelier is unique, this process may vary. Pay close attention to the wires; there will most likely be three of them: a black hot wire, a white neutral wire, and a green or bare copper ground wire.
If the chandelier has several lamp sockets, the black and white wires for each socket may not be connected yet. If this is the case, use a wire connector to connect the white wires. You should also connect the black wire leads.
Your chandelier’s connection to the mounting box will differ, so follow the instructions carefully.
Step 7: Install the mounting strap
If you have a mounting strap, screw it to the ceiling box, taking care to verify that the holes line up perfectly.
Step 8: Connect the wires
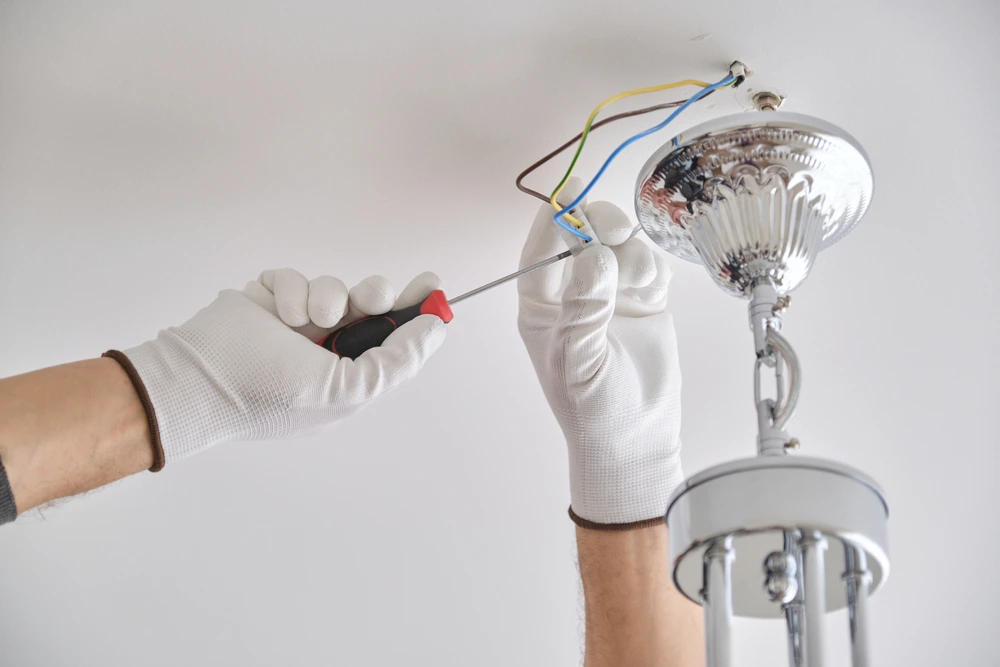
Your existing wiring should be able to be connected to your new chandelier. Keep in mind that white is neutral, black is hot, and bare copper or green is ground.
Connect the ground wire first. If your new ceiling box is metal, you’ll need to attach it to both the box and the lighting fixture, normally by looping it around a screw.
Then, using a wire connector, connect the neutral and hot wires.
Step 9: Mount the fixture base
You’re almost there! Again, this step will vary, but usually you’ll screen the fixture base to the ceiling box with two long screws. Consult your instructions.
Step 10: Install light bulbs
Screw in the light bulbs (ensuring they are the right wattage), and you’re done! Reconnect the electricity and enjoy your new ceiling lights.
Conclusion
By following this guide, you’ll soon have a wonderful new chandelier adorning your home. If you’re looking for chandeliers, Buildiro has a lot of options to choose from. Our chandeliers are made of durable and high-quality materials for practical uses, such as lighting up dark hallways, or providing light for an outdoor party or event.
FAQ
No, you do not require the services of an electrician. However, if you’re not confident with wiring, have little knowledge of electricity, or can’t access your house’s breaker, you should hire an electrician.
Yes, you can change a chandelier by yourself. However, certain parts can get tricky when you have to hold and screw at the same time. Some chandeliers can also be very heavy and have many moving parts, so having someone who can assist you will make the job easier.
Leave a Reply