Do you want to learn how to read a tape measure? It’s an essential skill to have in any toolbox, and once you understand the basics, it can be quite easy to master. This step-by-step guide will teach you all the basics of reading a tape measure so that you can easily understand and measure the length of any item. We’ll start from the ground up, going over the types of tape measures, the parts that make up a tape measure, and the basic markings you’ll find on them. We’ll also provide some tips and tricks for using a tape measure more effectively. After reading this guide, you’ll have all the knowledge you need to read a tape measure with confidence.
Types of Tape Measures
Before you start learning how to read a tape measure, you’ll first need to understand the different types of tape measures. This will help you select the right one for your needs and make reading the measurements on any given tape measure much easier. There are a few types of tape measures including the following: – Steel Tape Measures- Steel tape measures are the oldest type of tape measures and are constructed with a flexible steel blade that’s coated in vinyl to protect it from corrosion and wear-and-tear. While these are still used today, they are far less common than other types of tape measures. – Spring Loaded Tape Measures- Spring loaded tape measures were the next type of tape measure introduced and are still the most common type today. These types of tape measures use a spring-loaded mechanism to retract and extend the tape. They are available in both the standard and the retractable versions. – Retractable Tape Measures- Retractable tape measures are a newer type of tape measure that combines the convenience of a standard tape measure with the ease of use of a spring-loaded one. Retractable tape measures often also feature a locking mechanism to keep the tape from extending on its own. – Computerized Tape Measures- Computerized tape measures are the most modern type of tape measure and are often used by professionals. These tape measures feature an LCD screen that automatically displays additional information when you press a button.
Parts of a Tape Measure
Now that you know what types of tape measures exist, let’s talk about the parts that make up a tape measure. A tape measure is really just a fancy ruler that you can extend, and it has a few key parts that will help you use it more effectively. The main parts of a tape measure include: – The Head – The head is the part of the tape that you hold in your hand. It’s often designed with a rubber coating to provide a comfortable grip and protect your hands from blisters. The markings for measuring are usually printed on a metal plate behind the head. – The Hook – The hook is the end of the tape that remains inside the mechanism when you extend the tape. It is attached to a ratchet mechanism that allows you to extend the tape to any length. – The Hook Release – The hook release is a button or latch that holds the hook securely in place when you’re not extending the tape measure. – The End Stop – The end stop is the part of the tape measure that keeps the tape from going any further once you’ve reached the desired length. You’ll find the end stop on the back of most tape measures in the form of a button or a latch. – The Lock Button – The lock button is a button that is pressed to lock the tape in place at a certain length. It is often found on a meter or yard-long tape measure.
Basic Markings on a Tape Measure
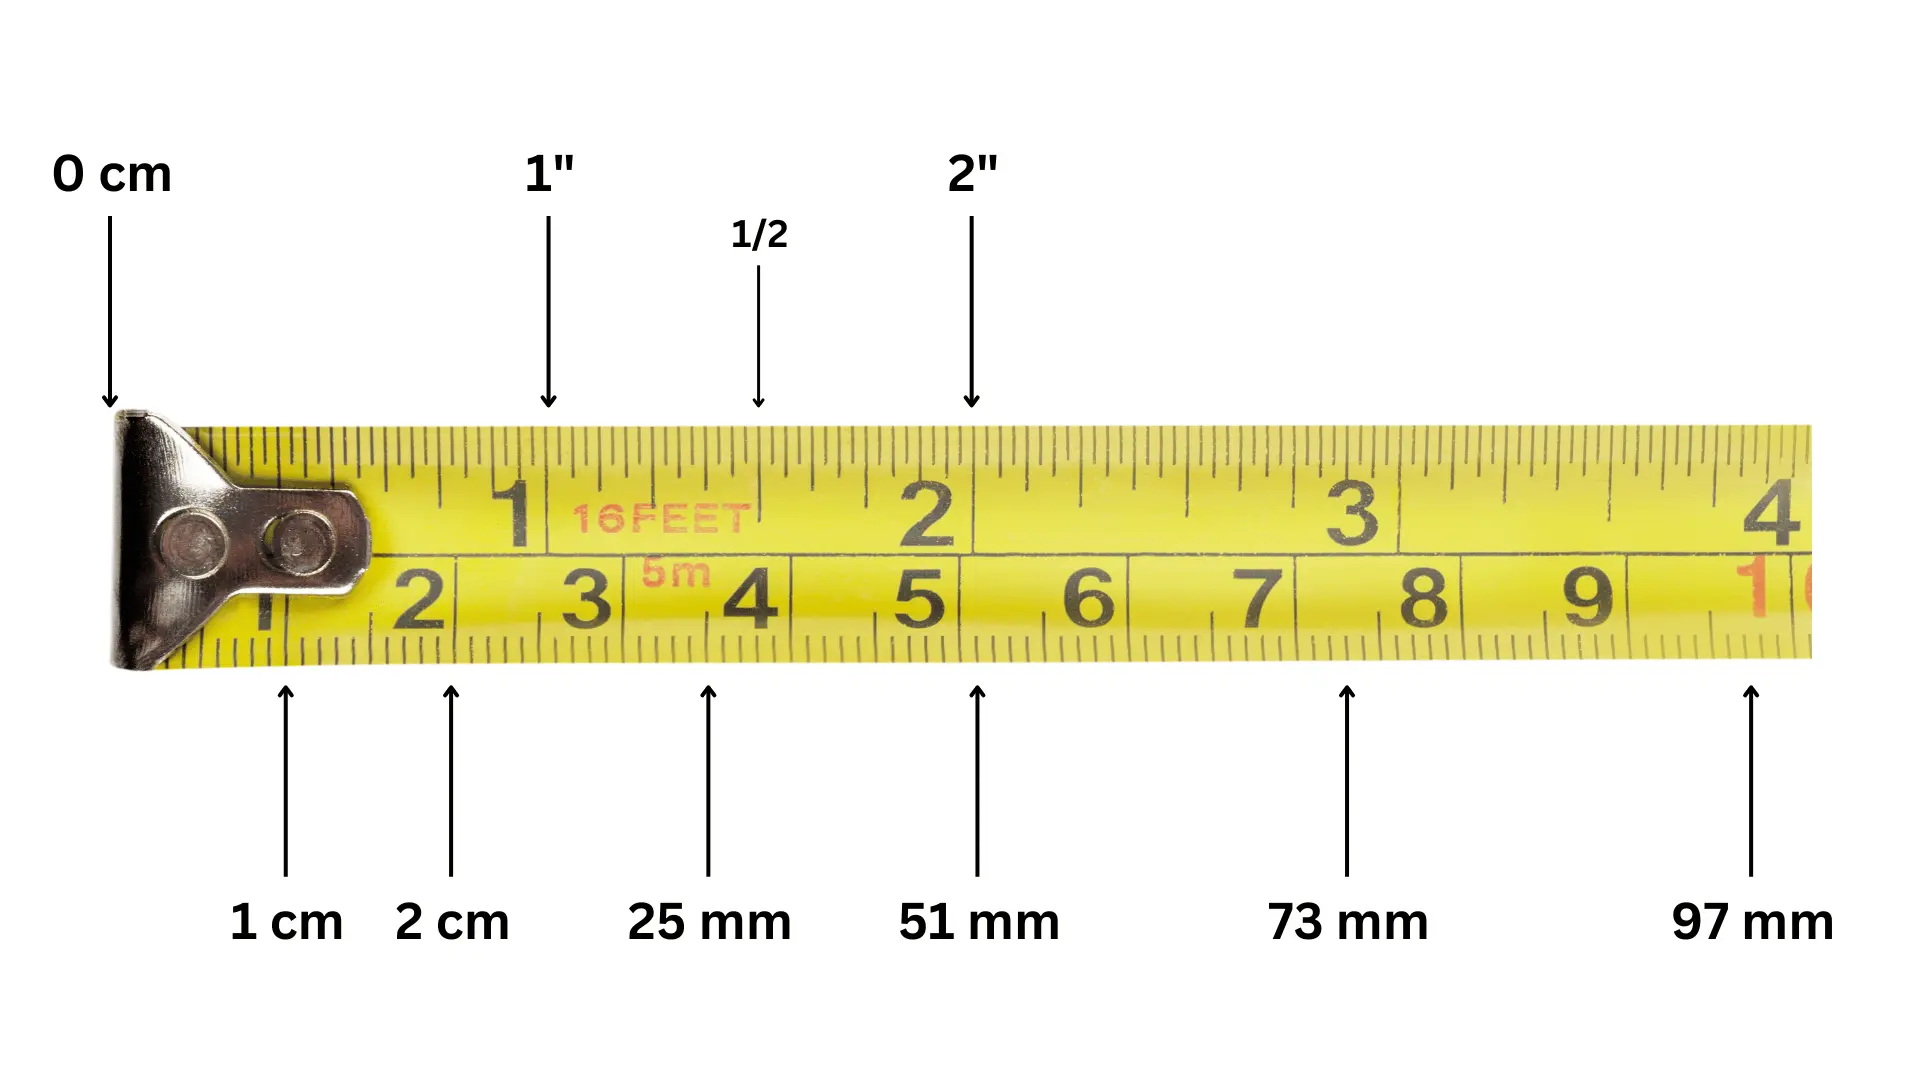
Now that you understand the parts that make up a tape measure, let’s talk about basic markings on a tape measure. The markings on a tape measure will vary between manufacturers, but you’ll always have a measurement scale that includes a length measurement, a unit of measurement (feet or inches), and an hash mark to indicate the end of the tape. You may also see a number scale that gives you more detailed information like the number of feet and inches needed to extend the tape measure to a certain length. If you’re using a metric tape measure, you’ll see a meter scale that gives you the length in meters.
How to Read a Tape Measure
Now that you understand the basics of reading a tape measure, let’s walk through a real-world example. You might find this easier to understand if you have a tape measure handy. Once you have it in your hand, follow these steps to easily read a tape measure: – Extend the Tape Measure to Your Desired Length – Your first step is to extend the tape measure to the desired length. You can do this by pulling the hook out and releasing it so that the tape measure extends to its full length. You can extend the tape measure to any length, so if you want to measure something that is farther away, you can extend the tape measure to a greater length. – Find the Length Measurement – Your next step is to find the length measurement on the tape. This will be a number followed by either the letter “ft” for feet or “m” for meters. If you’re using a metric tape measure, you may also see numbers in the hundreds or the thousands. – Find the Unit of Measurement – The unit of measurement will be located directly below the length measurement. It will either be the letters “ft” for feet or “m” for meters. If you’re using a metric tape measure, you may also see the letters “cm.” – Find the Hash Mark – Finally, locate the hash mark located at the end of the tape measure.
Tips for Using a Tape Measure
Now that you know how to read a tape measure, let’s talk about some tips for using a tape measure more effectively. Whether you’re using a standard or retractable tape measure, these tips will help you get the most out of your tape measure. – When extending the tape measure, don’t yank it out. Instead, extend it slowly and carefully so that you don’t warp the tape or break it. – When reading the measurement on the tape, make sure that the edge of the tape is parallel to the surface that you’re measuring. Reading from an angle will give you the wrong measurement. – If you’re measuring a surface that is uneven, consider taping a piece of paper to the surface and then measuring from the paper to the surface. This will give you a more accurate measurement. – Always clean your tape measure between uses and keep it in a safe place when it isn’t in use. – If you have large hands, consider getting a tape measure with a longer grip so that it feels more comfortable in your hands. – If you have small hands, you may find it more comfortable to use a standard tape measure since they are lighter and easier to hold.
Conclusion
Now that you know how to read a tape measure, you’ll never have to worry about getting the wrong measurement ever again. A tape measure is an essential tool for any toolbox, and once you know how to use it, it can be incredibly useful. This step-by-step guide will teach you all the basics of reading a tape measure so that you can easily understand and measure the length of any item. We’ll start from the ground up, going over the types of tape measures, the parts that make up a tape measure, and the basic markings you’ll find on them. We’ll also provide some tips and tricks for using a tape measure more effectively. After reading this guide, you’ll have all the knowledge you need to read a tape measure with confidence.
Leave a Reply